Do you want to import a floor plan, a blueprint, or a sketch into RoomSketcher? With a RoomSketcher Pro or Team subscription, you can upload (import) it and then trace over it. You will easily create a professional digital floor plan – no technical experience needed.
New! AI Convert — Skip Manual Tracing
Besides tracing over a blueprint manually, you can now upload a blueprint and let RoomSketcher’s AI Convert automatically transform it into an editable floor plan within seconds. This is ideal if you want a fast digital floor plan with minimal effort. Learn more here: Can I Import a Blueprint and Let AI Create My Floor Plan?
In this article, we walk you through the steps of uploading a blueprint and then manually tracing over it:
- Before You Start
- Upload a Blueprint
- Scale, Rotate and Crop a Blueprint
- Draw Over a Blueprint
- Add a Blueprint on a New Level
- Find the Blueprint again
- Frequently Asked Questions (FAQ)
You can also watch this short video:
What Should I Do Before I Start Drawing My Floor Plan?
Before you start, make sure that the blueprint or sketch is on your computer or tablet in PDF, JPG, or PNG format. If the blueprint is on paper, scan it or take a photo of it. You’ll upload this image to the RoomSketcher App so you can use it as a template.
If you're taking a photo, make sure the paper is lying flat and take the picture straight from above – that way, you'll have the best possible starting point.
How Do I Upload My Blueprint, Image, or Sketch to RoomSketcher?
Here’s how you can do it step by step:
- Click the Plus
icon in the top menu.
- Choose Import a Sketch.
- The Blueprint Upload page appears. Press Upload in the lower right.
- Select a PDF, JPG or PNG image on your device and then click Open.
For PDF files, you might be asked to specify the page number. - The blueprint appears in the Blueprint Properties area.
If you're using an iPad, please ensure that the RoomSketcher App has access to your Photos or any other apps from which you want to upload a blueprint.
Can I Scale, Rotate, and Crop My Uploaded Blueprint?
Yes, that's possible. The Blueprint Properties page has 3 tabs on the top right side: Rotate, Scale, and Crop.
Scale Tab
Scaling your blueprint ensures that all walls, furniture, and room layouts are sized correctly. In the RoomSketcher App, it’s super easy – just set the length of one known wall or item, and the app takes care of the rest.
To scale a blueprint:
- On the Scale tab, press the middle of the tape measure and drag it to an area of known length.
- Press and drag the ends to size the tape measure to the item on the blueprint.
- Type the known length in the New Length field on the right.
Note: If New Length turns red after you enter a length, it means that your length was either too short or long for scaling the blueprint.
- Press Apply. The blueprint is now scaled.
- Press Save. The Blueprint Properties page closes.
or
Use the Rotate or Crop tab to finalize your blueprint.
Rotate tab
(Optional) Using the Rotate tab in the RoomSketcher App, you can quickly fix the blueprint orientation or straighten it before you start drawing.
To rotate or straighten a blueprint:
- On the Rotate tab, press and drag the center of the Rotation tool to move it. Place it so that one end (the + part) is on a wall.
- Now press and drag the blue arrows on the other end of the tool and stretch it so that it is parallel to the wall. Your blueprint automatically straightens.
- (Optional) Press Rotate 90 clockwise (on the right) to rotate a blueprint.
Crop Tab
(Optional) You can use the Crop tab to remove any extra text or space around your blueprint.
To crop a blueprint:
- Press and drag the blue lines close to the edges of the floor plan.
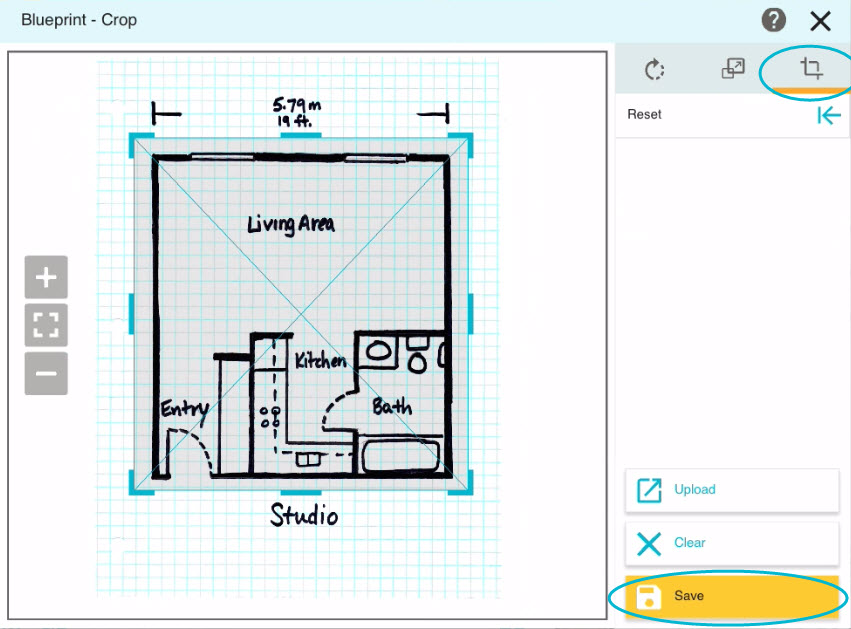
- Press Save to close the Blueprint Properties page.
How Do I Draw Over My Blueprint?
Once you’ve scaled and (optionally) rotated your blueprint in the RoomSketcher App, it becomes your perfect tracing layer. You’re now set to draw over it and turn it into a professional floor plan.
- Open Walls mode to draw all the walls, using the blueprint as a guide. Here are some tips:
- Ignore Doors and Windows as you draw. You will add them in the next step.
- Use + and - keys to make the wall thicker or thinner while drawing it.
- Use the arrow keys to move a wall while you are drawing it.
- Press the B button or the B key on your keyboard, to see just the blueprint.
- Press the F button or the F key on your keyboard, to see just the floor plan.
- Or press the F+B button or the A key on your keyboard, to see All.
- Next, open Windows mode and use the blueprint as a guide for where to add windows, doors, and stairs.
- Next, open Materials mode to add floor, ceiling, and wall finishes.
- In Furniture mode, you can add appliances, fixtures, and furniture to complete the project.
Tip: Press Menu > Blueprint to toggle the blueprint ON or OFF as you draw or after you have reopened your project.
How Can I Add a Blueprint on a New Level?
Do you want to draw from a blueprint on another level? Just follow these steps:
- Add a new level (see more here: Work with Floors or Levels).
- Open the
Menu, and click Blueprint.
- Continue with step 3 from section Upload a Blueprint, Image, or Sketch.
How Do I Find My Blueprint Again?
Once you’ve uploaded and started drawing from your blueprint, you might later wonder where to find it again. Open your project, click the yellow menu in the top left corner, and under View, select Blueprint so that it has a checkmark next to it. The blueprint should then appear in the drawing pane.
If you still don’t see your blueprint, check out our full troubleshooting guide here: Find my Blueprint in RoomSketcher